包的定义和调用

包的定义

下面的例子使用package定义了一个包mypack,其中声明了一个Abc类:

1
2
3
4
5
package mypack 
import chisel3 ._
class Abc extends Module {
val io = IO(new Bundle {})
}

包的调用

下面例子使用import命令调用了一个包mypack,_意味着包里面的所有类都被调用。

1
2
3
4
5
6
7
8
9
10
11
12
13
14
15
16
17
// 调用所有
import mypack._
class AbcUser extends Module{
val io = IO(new Bundle{})
val abc = new Abc()
}
// 调用单个
import mypack.Abc
class AbcUser1 extends Module{
val io = IO(new Bundle{})
val abc = new Abc()
}
// 单独调用
class AbcUser2 extends Module{
val io = IO(new Bundle{})
val abc = new mypack.Abc()
}

sbt的运行流程

chisel工程文件的典型组织方式如下:

1
2
3
4
5
6
7
8
9
10
11
project
├── src
│   ├── main
│   | ├── scala
│   | └── package
│   | └── subpackage
| └── test
| └── scala
| └── package
├── target
└── generated

直接运行命令sbt run,将会默认调用main文件夹下的工程文件:

1
sbt run

如果有多余一个可运行的代码,则列出并可以选择;也可以直接通过参数运行特定的文件:

1
sbt "runMain mypacket.MyObject"

接着就能够自动构建出相应的v代码。

整体chisel开发流程是:

Chisel Flow Chart

测试与验证

使用PeekPokeTester

首先设计一个DUT(Device Under Test),一个简单的两路与门:

1
2
3
4
5
6
7
8
9
10
11
import chisel3._
import chisel3.iotesters._ // PeakPokeTester is imported by this

clase DeviceUnderTest extends Module{
val io = IO(new Bundle{
val a = Input(UInt(2.W))
val b = Input(UInt(2.W))
val out = Output(UInt(2.W))
})
io.out := io.a & io.b
}

然后再设计一个testbench(这里使用到了 chisel3.iotesters 库):

1
2
3
4
5
6
7
8
9
10
class TesterSample(dut: DeviceUnderTest) extends PeekPokeTester(dut){
poke(dut.io.a, 0.U)
poke(dut.io.b, 1.U)
step(1) // run 1 clk cycle
println("Result is " + peek(dut.io.out).toString)
poke(dut.io.a, 2.U)
poke(dut.io.b, 3.U)
step(1) // run another clk cycle
println("Result is " + peek(dut.io.out).toString)
}

最后,运行这个测试单元:

1
2
3
4
5
class TesterSample extends App{
chisel3.iotester.Driver(() => new DeviceUnderTest()){ c =>
new TesterSample(c)
}
}

输出将打印peek的结构到屏幕上,同时,如果需要检查特定的值,可以调用expect:

1
2
3
4
5
6
7
8
9
10
class TesterSample(dut: DeviceUnderTest) extends PeekPokeTester(dut){
poke(dut.io.a, 0.U)
poke(dut.io.b, 1.U)
step(1) // run 1 clk cycle
expect(dut.io.out, 0)
poke(dut.io.a, 2.U)
poke(dut.io.b, 3.U)
step(1) // run another clk cycle
expect(dut.io.out, 2)
}

使用scala的ScalaTest测试器

ScalaTest是一个Scala的测试工具,同时适用于Chisel。

首先,在build.sbt引入依赖:

1
libraryDependencies += "org.scalatest" %% "scalatest" % "3.0.5" % "test"

然后,编写test:

1
2
3
4
5
6
7
8
9
10
11
12
13
14
15
16
17
// this is normal scala test
import org.scalatest._
class ExampleSpec extends FlatSpec with Matchers {
"Intergers" should "add" in {
val i = 2
val j = 3
i + j should be (5)
}
}
// this is chisel test
class SimpleSpec extends FlatSpec with Matchers {
"Tester" should "pass" in {
chisel3.iotester.Driver(() => new DeviceUnderTest()) { c =>
new Tester(c)
} should be (true)
}
}

使用sbt test的时候将会运行上面所有测试,如果想只运行下面的可以带上参数:

1
sbt "testOnly SimpleSpec"

波形输出

波形文件的输出需要额外导入Driver:

1
import chisel3.iotesters.Dirver

使用方式:

1
2
3
4
5
6
7
class WaveformSpec extends FlatSpec with Matchers {
"Waveform" should "pass" in { // what is this line's meaning?
Driver.excute(Array("--generate-vcd-output", "on"), () => new DeviceUnderTest()) { // DeviceUndetTest is a Class
c => new WaveFormTester(c) // WFT is a testbench
} should be (true)
}
}
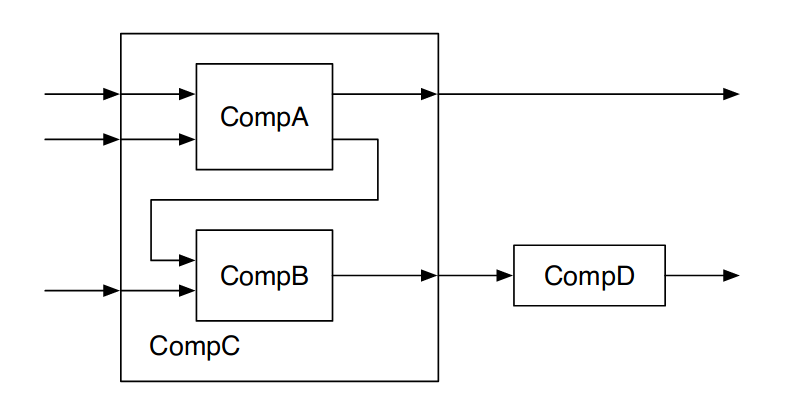
看到这里有两个问题:

  1. scala中的{}有哪些作用?
    目前知道作用只有定义类的情况,上述代码段中,中间的Driver应该不是定义类?其作用如何?
  2. should=>in等关键字或者操作符的作用?

可以使用scala的语法写tb,例如,直接测试所有可能(a, b 都为2位的信号,一共16种情况)的输入情况:

1
2
3
4
5
6
7
8
// traverse all the situation
for (a <- 0 until 4) {
for (b <- 0 until 4) {
poke(dut.io.a, a)
poke(dut.io.b, b)
step(1)
}
}

同时,可以使用C风格的printf调试信息的打印:

1
2
// printf
printf("dut: %d %d %d\n", io.a, io.b, io.out)

Chisel 的 main 函数和 build.sbt 文件

main

程序是从main函数开始运行的,当定义一个 App 对象的时候,将会隐式地定义 main 函数:

1
2
3
object testMain extends App{
chisel3.Driver.excute(Array[String](), () => new Main())
}

注意,这里定义的 testMain 是一个对象,而不是一个类!

当存在多个App时,需要sbt testMain指定是执行当前的这个App!

build.sbt

此文件的作用是规定当前使用的sbt版本等,防止联网自动更新使用最新版本(一般情况不需要),其中的内容有:

1
2
3
4
5
6
7
8
9
10
11
12
13
14
15
16
17
18
19
20
21
22
23
24
// See README.md for license details.

ThisBuild / scalaVersion := "2.13.8"
ThisBuild / version := "0.1.0"
ThisBuild / organization := "%ORGANIZATION%"

val chiselVersion = "3.5.4"

lazy val root = (project in file("."))
.settings(
name := "%NAME%",
libraryDependencies ++= Seq(
"edu.berkeley.cs" %% "chisel3" % chiselVersion,
"edu.berkeley.cs" %% "chiseltest" % "0.5.4" % "test"
),
scalacOptions ++= Seq(
"-language:reflectiveCalls",
"-deprecation",
"-feature",
"-Xcheckinit",
"-P:chiselplugin:genBundleElements",
),
addCompilerPlugin("edu.berkeley.cs" % "chisel3-plugin" % chiselVersion cross CrossVersion.full),
)

Module 组件 (Component)

一个系统往往由许多不同的组件相互级联组成,在Chisel中,组件就是模块(Module),这和verilog中的module一致。

module需要有IO接口,连接模块时,注意要连接对应的接口,下面是一个例子:

实现这些模块的连接:

1
2
3
4
5
6
7
8
9
10
11
12
13
14
15
16
17
18
19
20
21
22
23
24
25
26
27
28
29
30
31
32
33
34
35
36
37
38
39
40
41
42
43
44
45
46
47
48
49
50
51
52
53
54
55
56
57
58
59
60
61
62
63
64
65
66
67
68
69
70
71
72
73
74
75
76
77
78
class CompA extends Module{
val io = IO(new Bundle {
val a_i = Input(UInt(8.W))
val b_i = Input(UInt(8.W))
val x_o = Output(UInt(8.W))
val y_o = Output(UInt(8.W))
})
// Implentation
}

class CompB extends Module{
val io = IO(new Bundle {
val a_i = Input(UInt(8.W))
val b_i = Input(UInt(8.W))
val x_o = Output(UInt(8.W))
})
// Implentation
}

class CompC extends Module{
val io = IO(new Bundle {
val a_i = Input(UInt(8.W))
val b_i = Input(UInt(8.W))
val c_i = Input(UInt(8.W))
val x_o = Output(UInt(8.W))
val y_o = Output(UInt(8.W))
})

val compA = new CompA()
val compB = new CompB()

// input
// Atention!!! do not code this wrong direciton, such as
// io.a_i := compA.io.a_i
compA.io.a_i := io.a_i
compA.io.b_i := io.b_i
compB.io.b_i := io.c_i

// output
io.x_o := compA.io.x_o
io.y_o := compB.io.x_o

// internal connection
compB.io.a_i := compA.io.y_o
}

class CompD extends Module {
val io = IO(new Bundle {
val in = Input(UInt(8.W))
val out = Output(UInt(8.W))
})
// Implentation
}

class TopLevel extends Module {
val io = IO(new Bundle {
val a_i = Input(UInt(8.W))
val b_i = Input(UInt(8.W))
val c_i = Input(UInt(8.W))
val m_o = Output(UInt(8.W))
val n_o = Output(UInt(8.W))
})

val compC = new CompC()
val compD = new CompD()

// Input
compC.io.a_i := io.a_i
compC.io.b_i := io.b_i
compC.io.b_i := io.c_i

// Output
io.m_o := compC.io.x_o
io.n_o := compD.io.x_o

// Internal
compD.io.a_i := compC.io.y_o
}

新增一个语法,switch用作多路选择器:

1
2
3
4
5
6
switch(io.fn) {
is(0.U) { io.y := io.a + io.b }
is(1.U) { io.y := io.a - io.b }
is(2.U) { io.y := io.a | io.b }
is(3.U) { io.y := io.a & io.b }
}